Task Scheduler
Cooperative multitasking for Arduino microcontrollers
Version 2.0.0: 2015-12-23
OVERVIEW:
A lightweight implementation of cooperative multitasking (task scheduling) supporting:
Periodic task execution (with dynamic execution period in milliseconds – frequency of execution)
Number of iterations (limited or infinite number of iterations)
Execution of tasks in predefined sequence
Dynamic change of task execution parameters (frequency, number of iterations, callback methods)
Power saving via entering IDLE sleep mode when tasks are not scheduled to run
Support for event-driven task invocation via Status Request object
Support for task IDs and Control Points for error handling and watchdog timer
Support for Local Task Storage pointer (allowing use of same callback code for multiple tasks)
Support for layered task prioritization
Scheduling overhead: between 15 and 18 microseconds per scheduling pass.
TASK:
“Task” is a container concept that links together:
Program code performing specific task activities (callback methods)
Execution interval
Number of execution iterations
(Optionally) Execution event (Status Request)
(Optionally) Pointer to a Local Task Storage area
Tasks perform certain functions, which could require periodic or one-time execution, update of specific variables, or waiting for specific events. Tasks also could be controlling specific hardware, or triggered by hardware interrupts.
For execution purposes Tasks are linked into execution chains, which are processed by the Scheduler in the order they were added (linked together).
Starting with version 2.0.0 TaskScheduler supports task prioritization. Please refer to the specific chapter of this manual for details on layered prioritization.
Each task performs its function via a callback method. Scheduler calls Task’s callback method periodically until task is disabled or runs out of iterations. In addition to “regular” callback method, two additional methods could be utilized for each task: a callback method invoked every time the task is enabled, and a callback method invoked once when the task is disabled. Those two special methods allow tasks to properly initiate themselves for execution, and clean-up after execution is over (E.g., setup pin modes on enable, and always bring pin level to LOW at the end).
Tasks are responsible for supporting cooperative multitasking by being “good neighbors”, i.e., running their callback methods quickly in a non-blocking way, and releasing control back to scheduler as soon as possible.
Scheduler is executing Tasks' callback methods in the order the tasks were added to the chain, from first to last. Scheduler stops and exists after processing the chain once in order to allow other statements in the main code of loop() method to run. This is referred to as a “scheduling pass”.
(Normally, there is no need to have any other statements in the loop() method other than the Scheduler's execute() method).
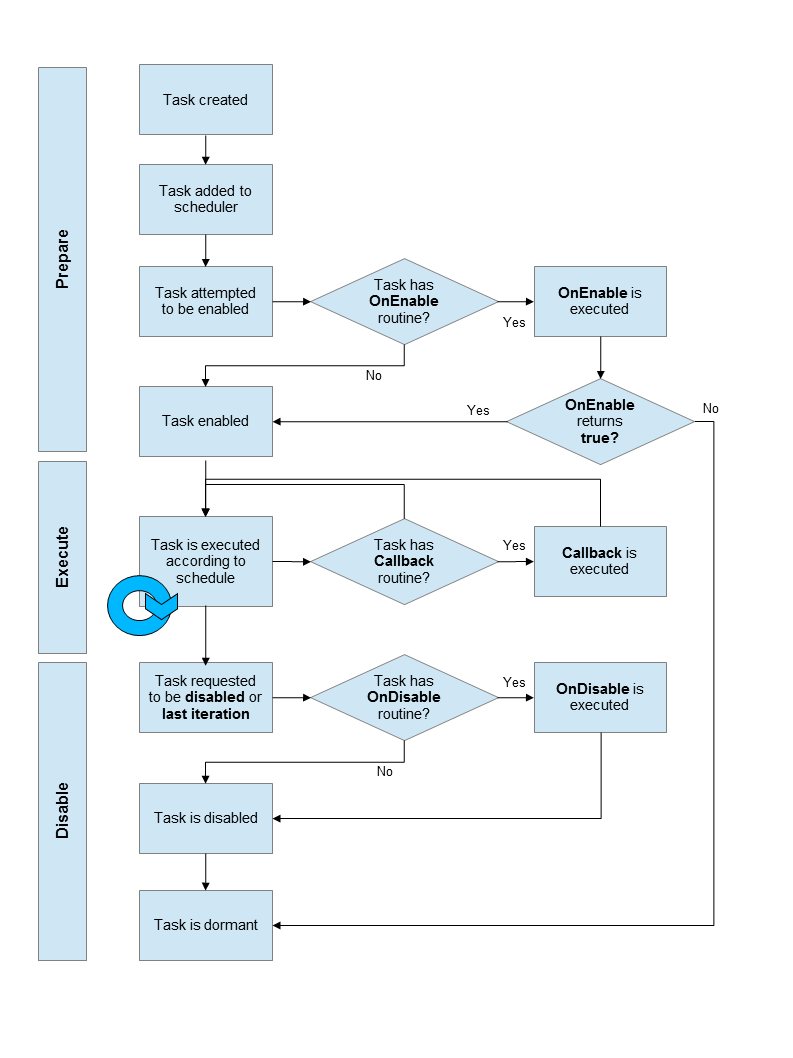
Below is the flowchart of a Task lifecycle:
TaskScheduler library maybe compiled with different compilation controls enabled/disabled. This is a way to limit TaskScheduler functionality (and size) for specific purpose (sketch). This is achieved by defining specific #define parameters before TaskScheduler.h header file. Specifically:
If compiled with _TASK_SLEEP_ON_IDLE_RUN enabled, the scheduler will place processor into IDLE sleep mode (for approximately 1 ms, as the timer interrupt will wake it up), after what is determined to be an “idle” pass. An Idle Pass is a pass through the task chain when no Tasks were scheduled to run their callback methods. This is done to avoid repetitive idle passes through the chain when no tasks need to be executed. If any of the tasks in the chain always requires immediate execution (aInterval = 0), then there will be no IDLE sleep between task's callback method execution.
NOTE: Task Scheduler uses millis() to determine if tasks are ready to be invoked. Therefore, if you put your device to any “deep” sleep mode disabling timer interrupts, the millis() count will be suspended, leading to effective suspension of scheduling. Upon wake up, active tasks need to be re-enabled, which will effectively reset their internal time scheduling variables to the new value of millis(). Time spent in deep sleep mode should be considered “frozen”, i.e., if a task was scheduled to run in 1 second from now, and device was put to sleep for 5 minutes, upon wake up, the task will still be scheduled 1 second from the time of wake up. Executing enable() method on this tasks will make it run as soon as possible. This is a concern only for tasks which are required to run in a truly periodical manner (in absolute time terms).
In addition to time-only (millis() only) invocation, tasks can be scheduled to wait on an event employing StatusRequest objects (more about Status Requests later).
Consider a scenario when one task (t1) is performing a function which affects execution of many tasks (t2, t3). In this case the task t1 will “signal” completion of its function via Status Request object. Tasks t2 and t3 are “waiting” on the same Status Request object. As soon as status request completes, t2 and t3 are activated.
Alternative scenario is the ne task (t1) and waiting for the completion of a number of tasks (t2, t3). When done, t2 and t3 signal completion of their functions, t1 is invoked.
Please see the code examples at the end of this document, and included with the library package for details.
COMPILE PARAMETERS:
This library could be compiled in several configurations.
Parameters (#defines) defining what functionality should or should not be included need be defined before the library header file in the body of arduino sketch.
#define _TASK_TIMECRITICAL
...will compile the library with time critical tracking option enabled.
Time critical option keeps track when current execution took place relative to when it was scheduled, and where next execution time of the task falls. Two methods provide this information.
Task::getStartDelay() method: return number of milliseconds between current system time (millis) and point in time when the task was scheduled to start. A value of 0 (zero) indicates that task started right on time per schedule.
Task::getOverrun() method: If getOverrun returns a negative value, this Task’s next execution time point is already in the past, and task is behind schedule. This most probably means that either task’s callback method's runtime is too long, or the execution interval is too short (and therefore schedule is too aggressive).
A positive value indicates that task is on schedule, and callback methods have enough time to finish before the next scheduled pass.
#define _TASK_SLEEP_ON_IDLE_RUN
...will compile the library with the sleep option enabled (AVR boards only).
When enabled, scheduler will put the microcontroller into SLEEP_MODE_IDLE state if none of the tasks’ callback methods were activated during execution pass. IDLE state is interrupted by timers once every 1 ms. Putting microcontroller to IDLE state helps conserve power. Device in SLEEP_MODE_IDLE wakes up to all hardware and timer interrupts, so scheduling is kept current.
#define _TASK_STATUS_REQUEST
…will compile TaskScheduler with support for StatusRequest object. Status Requests are objects allowing tasks to wait on an event, and signal event completion to each other.
#define _TASK_WDT_IDS
…will compile TaskScheduler with support for Task IDs and Control Points. Each task can be (and is by default) assigned an ID, which could be used to identify the task in case there is a problem with it. Furthermore within the task, Control Points could be defined to further help with pinpointing potential problem areas. For instance, the tasks which deal with external resources (sensors, serial communications, anything hardware dependent) can be blocked (or hung), by failed hardware. In this case, a watchdog timer could be employed to trap such a failed task, and identify which one (by task id) and where in the task (by a control point) the problem is likely located.
NOTE: by default, talk IDs are assigned sequentially (1, 2, 3, …) to the tasks as they are being created. Programmer can assign a specific task id. Task ids are unsigned integers.
Control points provide a way to identify potential problem points within a task. Control points are unsigned integers as well. Please note that there is only one control point per task, and it is set to zero when the task’s callback method is invoked (this is done to prevent “stray” control point from previous task(s) confusing the matters.
Example #7 contains a test of task ID and control points functionality.
#define _TASK_LTS_POINTER
…will compile TaskScheduler with support for Local Task Storage pointer (LTS). LTS is a generic (void*) pointer which could be set to reference a variable or a structure specific to a particular task. A callback method can get access to specific variables by getting reference to a currently running task from the scheduler, and then casting (void*) LTS pointer to the appropriate pointer type.
NOTE: above parameters are DISABLED by default, and need to be explicitly enabled by placing appropriate #define statements in front of the #include statement for the TaskScheduler header file.
#define _TASK_PRIORITY
…will compile TaskScheduler with support for layered task prioritization. Task prioritization is achieved by creating several schedulers, and organizing them in priority layers. Tasks are assigned to schedulers corresponding to their priority. Tasks assigned to the “higher” layers are evaluated for invocation more frequently, and are given priority in execution in case of the scheduling coincidence. More about layered prioritization in the API documentation and TaskScheduler examples.
TASK PRIORITY AND COOPERATIVE MULTITASKING:
Starting with version 2.0.0 TaskScheduler supports task prioritization. Priority is associated with a Scheduler, not individual Tasks, hence the concept of priority layers. Tasks subsequently are assigned to schedulers corresponding to their desired priority. The lowest priority Scheduler is called “base scheduler” or “base layer”. Let’s call higher priority schedulers by their priority number, with larger number corresponding to higher priority of task execution.
Task prioritization is achieved by executing the entire chain of tasks of the higher priority scheduler for every single step (task) of the lower priority chain. Note that actual callback method invocation depends on priority and the timing of task schedule. However, higher priority tasks are evaluated more frequently and are given priority in case of scheduling collision.
For most tasks TaskScheduler does not need task priority functionality. Prioritization requires additional scheduling overhead, and should be used only for critical tasks.
A few points on that:
1. Plain (non-layered) execution chain is simple and efficient. The main idea is to minimize scheduling overhead by Scheduler going through the chain. Each priority layer adds scheduling overhead to overall task chain execution. Let’s review 3 scenarios:
I. Flat chain of 7 tasks:
Scheduling evaluation sequence:
1 2 3 4 5 6 7
Scheduling overhead:
O = B * T = 7 * 18 = 126 microseconds,
Where:
O – scheduling overhead
B – number of tasks in the base layer
T – scheduling overhead of a single task execution evaluation (currently with Arduino Uno running at 16 Mhz is between 15 and 18 microseconds).
II. Two priority layers of 7 tasks.
Tasks 1, 2, 3, 4, 5 are base priority and 6, 7 are higher priority:
Scheduling evaluation sequence:
6 7 1 6 7 2 6 7 3 6 7 4 6 7 5
Scheduling overhead:
O = (B + B * P1) * T = (5 + 5 * 2) * 18 = 270 microseconds,
Where:
O – scheduling overhead
B – number of tasks in the base layer
P1 – number of tasks in the priority 1 layer
T – scheduling overhead of a single task execution evaluation (currently with Arduino Uno running at 16 Mhz is between 15 and 18 microseconds).
III. Three priority layers of 7 tasks.
Tasks 1, 2, 3, are base priority, 4, 5 are priority 1, and 6, 7 are priority 2:
Scheduling evaluation sequence:
6 7 4 6 7 5 1 6 7 4 6 7 5 2 6 7 4 6 7 5 3
Scheduling overhead:
O = (B + B * P1 + B * P1 * P2) * T = (3 + 3 * 2 + 3 * 2 * 2) * 18 = 378 microseconds,
Where:
O – scheduling overhead
B – number of tasks in the base layer
P1 – number of tasks in the priority 1 layer
P2 – number of tasks in the priority 2 layer
T – scheduling overhead of a single task execution evaluation (currently with Arduino Uno running at 16 Mhz is between 15 and 18 microseconds).
Scheduling overhead of a 3 layer prioritization approach is 3 times higher than that of a flat execution chain. Do evaluate if task prioritization is really required for your sketch.
2. TaskScheduler is NOT a pre-emptive multi-tasking library. Nor is it a Real-Time OS. There is no way to break execution of one task in favor of another. Therefore callback methods require careful programming for cooperative behavior.
This has, however, significant benefits: you don't need to worry about concurrency inside the callback method, since only one callback method runs at a time, and could not be interrupted. All resources are yours for that period of time, no one can switch the value of variables (except interrupt functions of course...), etc. It is a stable and predictable environment, and it helps a lot with writing stable code.
A number of things could be done instead of priorities:
1. Schedule your critical tasks to run more frequently than the other tasks
.
(Since you can
control the interval, you could also change the task to run more or
less frequently as the situation demands).
2. If one particular callback routine is critical, create a couple of tasks referring to the same callback and "sprinkle" them around the chain:
Scheduler ts;
Task t1(20, TASK_FOREVER, &callback1, &ts);
Task t2(1000, TASK_FOREVER, &callback2, &ts);
Task t3(20, TASK_FOREVER, &callback1, &ts);
Task t4(1000, TASK_FOREVER, &callback4, &ts);
t3.delay(10);
Note that t1 and t3 call the same callback method, and are shifted in time by 10 millis. So effectively callback1 will be called every 10 millis, but would be "sandwiched" between t2 and t4.
3. Use short efficient callback methods written for cooperative multitasking.
What that means is:
a) DO NOT use Arduino's delay() function. It is blocking and will hold the entire chain. Instead break the callback method into two, switch the callback method of the task where delay is necessary and delay the task by that number of millis. You get your delay, and other tasks get a chance to run:
instead of:
void callback() {
... stuff
delay(1000);
... more stuff
}
do this:
void callback1() {
... stuff
t1.setCallback(&callback2);
t1.delay(1000);
}
void callback2() {
... more stuff
t1.setCallback(&callback1);
}
b) Same goes to pulseIn() function. If you have to use it, set the timeout parameter such that it is not a default 1 second. PulseIn functionality could be achieved via pin interrupts, and that solution is non-blocking.
c) Do don run long loops (for or do/while) in you callback methods. Make the main arduino loop be the loop driver for you:
instead of:
void callback() {
for(int i=0; i<1000; i++) {
... stuff // one loop action
}
}
do this:
Task t1(TASK_IMMEDIATE, 1000, &callback);
void callback() {
int i = t1.getRunCounter() -1;
... stuff // one loop action
}
or this:
Task t1(TASK_IMMEDIATE, 1000, &callback, true, &t1On);
int i;
bool t1On() {
i = 0;
return true;
}
void callback() {
... stuff // one loop action
i++;
}
REMEMBER: you are already inside the loop - take advantage of it.
d) Break long running callback methods into several shorter ones, and pass control from one to the other via setCallback() method:
Task t1(TASK_IMMEDIATE, TASK_FAREVER, &callback);
void callback() {
... do some stuff
t1.setCallback(&callback_step2);
}
void callback_step2() {
... do more stuff
t1.setCallback(&callback_step3);
}
void callback_step3() {
... do last part of the stuff
t1.setCallback(&callback);
t1.delay(1000);
}
This will execute all parts of the callback function in three successive steps, scheduled immediately, but allowing other tasks in the chain to run. Notice that task is scheduled to run immediately, and 1 second period is achieved by delaying the task for 1000 millis at the last step.
Alternatively you could schedule the task to run every 1000 millis and use forceNextIteration() method in steps 1 and 2 (but not 3!)
Task t1(1000, TASK_FOREVER, &callback);
void callback() {
... do some stuff
t1.setCallback(&callback_step2);
t1.forceNextIteration();
}
void callback_step2() {
... do more stuff
t1.setCallback(&callback_step3);
t1.forceNextIteration();
}
void callback_step3() {
... do last part of the stuff
t1.setCallback(&callback);
}
e) Compile the library with _TASK_TIMECRITICAL enabled and check if your tasks are falling behind schedule. If they are - you need to optimize your code further (or maybe re-evaluate your schedule). If they are not - all is well and you don't need to do anything. E.g., I have a spider robot which needs to measure distance, control motors, and keep track of the angle via querying gyroscope and accelerometer every 10 ms. The idea was to flash onboard LED if any of the tasks fall behind. At 10 ms interval for the gyro the LED does not flash, which means none of the tasks are blocking the others from starting on time.
API DOCUMENTATION:
TASKS:
CREATION:
Task();
Default constructor.
Takes no parameters and creates a task that could be scheduled to run at every scheduling pass indefinitely, but does not have a callback method defined, so no code execution will actually take place.
All tasks are created disabled by default.
Task(unsigned long aInterval, long aIterations, void (*aCallback)(), Scheduler* aScheduler, bool aEnable, bool (*aOnEnable)(), void (*aOnDisable)())
Constructor with parameters.
Creates a task that is scheduled to run every <aInterval> milliseconds, <aIterations> times, executing <aCallback> method on every pass.
aInterval is in milliseconds (default = 0)
aIteration in
number of times, -1 for indefinite execution (default = -1)
Note:
Tasks do not remember the number of iteration set initially.
After the iterations are done, internal iteration counter is 0. If
you need to perform another set of iterations, you need to set the
number of iterations again.
Note: Tasks which performed
all their iterations remain active.
aCallback is a pointer to a void callback method without parameters (default = NULL)
aScheduler – optional reference to existing scheduler. If supplied (not NULL) this task will be appended to the task chain of the current scheduler). (default = NULL)
aEnable – optional. Value of true will create task enabled. (default = false)
aOnEnable is a pointer to a bool callback method without parameters, invoked when task is enabled. If OnEnable method returns true, task is enabled. If OnEnable method return false, task remains disabled (default = NULL)
aOnDisable is a pointer to a void callback method without parameters, invoked when task is disabled (default = NULL)
All tasks are created disabled by default (unless aEnable = true). You have to explicitly enable the task for execution.
NOTE: OnEnable callback method is called immediately when task is enabled, which could be well ahead of the scheduled execution time of the task. Please bear that in mind – other tasks, hardware, serial interface may not even be initialized yet. It is always advisable to explicitly enable tasks with OnEnable methods after all initialization methods completed (e.g., at the end of setup() method)
Enabled task is scheduled for execution as soon as the Scheduler's execute() methods gets control. In order to delay first run of the task, use enableDelayed or delay method (for enabled tasks) method.
Task(void (*aCallback)(), Scheduler* aScheduler, bool (*aOnEnable)(), void (*aOnDisable)())
If compiled with support for Status Request objects, this constructor creates a Task for activation on event (since such tasks must run waitFor() method, their interval, iteration and enabled status will be set by that method (to 0, 1 and false respectively).
INFORMATION
The following 3 “getter” methods return task status (enabled/disabled), execution interval in milliseconds, number of remaining iterations.
bool isEnabled()
unsigned long getInterval()
long getIterations()
long getStartDelay()
If library is compiled with _TASK_TIMECRITICAL enabled, you can assess how much later the callback method was invoked against when it was scheduled to be invoked. The return value of getStartDelay () method provides this information in milliseconds.
long getOverrun()
If library is compiled with _TASK_TIMECRITICAL enabled, tasks are monitored for “long running” scenario. A “long running” task is a task that does not finish processing its callback methods quickly, and thus creates a situation for itself and other tasks where they don't run on a scheduled interval, but rather “catch up” and are behind. When task scheduler sets the next execution target time, it adds Task's execution interval to the previously scheduled execution time:
next execution time = current execution scheduled time + task execution interval
If next execution time happens to be already in the past (next execution time < millis()), then task is considered overrun. GetOverrun method returns number of milliseconds between next execution time and current time. If the value is negative, the task has overrun (cut into the) next execution interval by that many milliseconds.
Positive value indicate number of milliseconds of slack this task has for execution purposes.
unsigned long getRunCounter()
Returns
the number of the current run. “Current run” is the number of
times a callback method has been invoked since the last time a task
was enabled.
NOTE: The runCounter value is incremented before callback method is invoked. If a task is checking the runCounter value within its callback method, then the first run value is 1.
If task T1 is checking the runCounter value of another task (T2) , then value = 0 indicates that T2 has not been invoked yet, and value = 1 indicates that T2 has run once.
bool isFirstIteration()
Indicates whether current pass is (or will be) a first iteration of the task.
bool isLastIteration()
For tasks with a limited number of iterations only, indicates whether current pass is the last iteration.
CONTROL:
void enable();
Enables the task, and schedules it for immediate execution (without delay) at this or next scheduling pass depending on when the task was enabled. Scheduler will execute the next pass without any delay because there is a task which was enabled and requires execution.
NOTE: if task being enabled is not assigned to a scheduler and is not part of execution chain, then task will not be enabled.
NOTE: enable() invokes task’s OnEnable method (if not NULL) immediately, which can prepare task for execution. OnEnable must return a value of true for task to be enabled. If OnEnable returns false, task remains disabled. OnEnable is invoked every time enable is called, regardless if task is already enabled or not. Alignment to current millis() is performed after OnEnable exits, so any changes to the interval inside OnEnable is taken into consideration.
TaskScheduler allows tasks to be added to the a Scheduler and enabled at the time of creation. Be very careful with such tasks – the OnEnable method will be executed immediately, while certain objects (i.e., other Tasks, libraries) are not yet ready (e.g., Wire.begin() was not yet called), or hardware not yet activated (pins not set to INPUT or OUTPUT).
It is very much recommended to to enable all tasks at the end of setup() method after all initializations are done.
If you require immediate execution of already enabled task, use forceNextIteratoin() method instead of enable(): it achieves the result, but does not call OnEnable method.
NOTE: in the event enable() method is called inside the OnEnable callback method (thus basically creating indefinte loop), TaskScheduler will only call OnEnable once (thus protecting the Task against OnEnable infinite loop).
bool enableIfNot();
Enables the task only if it was previously disabled. Returns previous enable state: true if task was already enabled, and false if task was disabled. Since enable() schedules Task for execution immediately, this method provides a way to activate tasks and schedule them for immediate execution only if they are not active already.
void delay();
Schedules the task for execution after a delay (aInterval), but does not change the enabled/disabled status of the task.
NOTE: a delay of 0 (zero) will delay task for current execution interval. Use forceNextIteration() method to force execution of the task’s callback during immediate next scheduling pass.
void forceNextIteration();
Schedules the task for execution during immediate next scheduling pass.
The Task must be already enabled prior to this method.
Note: Task’s schedule is adjusted to run from this moment in time. For instance: if a task was running every 10 seconds: 10, 20, 30, .., calling forceNextIteration at 44th second of task execution will make subsequent schedule look like: 44, 54, 64, 74, ..
void enableDelayed();
Enables the task, and schedules it for execution after task's current scheduling interval (aInterval).
void enableDelayed (unsigned long aDelay);
Enables the task, and schedules it for execution after a specific delay (aDelay, which maybe different from aInterval).
void restart();
For tasks with limited number of iterations only, restart method will re-enable the task, set the number of iterations back to last set value, and schedule task for execution as soon as possible.
void restartDelayed (unsigned long aDelay);
Same as restart() method, with the only difference being that Task is scheduled to run first iteration after a delay = aDelay milliseconds.
bool disable();
Disables the task. Scheduler will not execute this task any longer, even if it remains in the chain. Task can be later re-enabled for execution.
Return previous enabled state: true if task was enabled prior to calling disable, and false otherwise.
If not NULL, task’s OnDisable method is invoked immediately. OnDisable is invoked only if task was in enabled state. Calling disable 3 times for instance will invoke OnDisable only once.
void set(unsigned long aInterval, long aIterations, void (*aCallback)() , bool (*aOnEnable)() , void (*aOnDisable)());
Allows dynamic control of task execution parameters in one method call.
Note: OnEnable and OnDisable parameters can be omitted. In that case they will be assigned to NULL and respective methods will no longer be called. Therefore it is advisable to use either all five parameters explicitly, or employ individual “setter” methods below instead.
Next five “setter” methods allow changes of individual task execution control parameters.
void setInterval (unsigned long aInterval)
void setIterations (long aIterations)
void setCallback (void (*aCallback)())
void setOnEnable (bool (*aCallback)())
void setOnDisable (void (*aCallback)())
NOTE: Next execution time calculation takes place after the callback method is called, so new interval will be used immediately by the scheduler. For the situations when one task is changing the interval parameter for the other, setInterval method calls delay explicitly to guarantee schedule change, however it does not enable the task if task is disabled.
NOTE: Tasks that ran through all their allocated iterations are disabled. SetIterations() method DOES NOT enable the task. Either enable explicitly, or use restart methods.
Please note that as a result execution of the taks is delayed by the provided interval. If immediate invocation is required, call forceNextIteration() method after setting a new interval.
STATUS REQUEST METHODS:
void waitFor(StatusRequest* aStatusRequest, unsigned long aInterval = 0, long aIterations = 1)
void waitForDelayed(StatusRequest* aStatusRequest, unsigned long aInterval = 0, long aIterations = 1)
If compiled with support for Status Requests, these methods make task wait for the completion of aStatusRequest event.
By default waitFor() sets tasks interval to 0 (zero) for immediate execution when event happens, and also sets the number of iterations to 1. However, you can specify different interval and number of iterations.
By default waitForDelayed() sets tasks interval to a supplied value or (if omitted or zero) keeps the current interval, so delayed execution will take place when the event happens. It also sets the number of iterations to 1 by default if not supplied.
When Status Request object completes, all tasks waiting on it are executed during next scheduling pass. Tasks waiting via waitFor() method are executed immediately. Tasks waiting via waitForDelayed() method are activated, but executed after current or supplied interval delay.
Note: aStatusRequest should be “activated” by calling setWaiting() method before making a task wait on it. Otherwise, the task will execute immediately.
The sequence of events to use Status Request object is as follows:
Create a status request object
Activate status request object (calling its setWaiting() method)
Set up tasks to wait of the event completion
Signal completion of event(s)
StatusRequest* getStatusRequest()
Returns a StatusReqeust object this Task was waiting on.
TASK ID, CONTROL POINTS METHODS:
void setId(unsigned int aID);
If compiled with support for Task IDs, this method will set the task ID explicitly.
Calling this method is not necessary as task IDs are assigned automatically during task creation: 1, 2, 3, …
unsigned int getId();
If compiled with support for Task IDs, this method return current task’s ID.
void setControlPoint (unsigned int aPoint);
If compiled with support for Task IDs, this method will set a control point in the task’s code. Control points are similar to “try…catch” blocks, with control point ID specifying where in the code the “try” part started, and a mechanism like watchdog timer providing the “catch” functionality.
unsigned int getControlPoint()
If compiled with support for Task IDs, this method will return currently set control point for this task.
LOCAL TASK STORAGE METHODS:
void setLtsPointer(void *aPtr);
If compiled with support for LTS, this method will set the task's local storage pointer.
void *getLtsPointer();
If compiled with support for LTS, this method will return reference to the task's local storage.
Note: the value returned has type (void *), and needs to be re-cast into appropriate pointer type. Please refer to example sketches for implementation options.
STATUS REQUEST:
CREATION:
StatusRequest()
Default constructor.
Takes no parameters. Creates Status Request object, which is assigned a status of “completed” on creation.
void setWaiting(unsigned int aCount = 1)
Activates Status Request object. By default each object is set to wait on one event only, however, if aCount is supplied, Status Request can wait on multiple events. For instance, setWaiting(3) will wait on three signals. An example could be waiting for completion of measurements from 3 sensors.
bool signal(int aStatus)
Signals completion of the event to the Status Request object, and passes a completion code, which could be interrogated later.
Note: passing a negative status code to the status request object is considered reporting an error condition, and will complete the status request regardless of how many outstanding signals it is still waiting for.
Note: only the latest status code is kept.
bool signalComplete (int aStatus)
Signals completion of ALL events to the Status Request object, and passes a completion code, which could be interrogated later. The status request completes regardless of how many events it is still waiting on.
bool pending()
Returns true if status request is still waiting for event or events to happen.
bool completed ()
Returns true if status has completed.
int getStatus()
Returns the status code passed to the status request object by the signal() and signalComplete() methods.
Any positive number is considered a successful completion status.
A 0 (zero) is considered a default successful completion status.
Any negative number is considered an error code and unsuccessful completion of a request.
TASK SCHEDULER:
CREATION:
Scheduler()
Default constructor.
Takes no parameters. Creates task scheduler with default parameters and an empty task queue.
void init()
Initializes the task queue and scheduler parameters, Executed as part of constructor, so don't need to be explicitly called after creation.
Note: be default (if compiled with _TASK_TIMECRITICAL enabled) scheduler is allowed to put processor to IDLE sleep mode. If this behavior was changed via allowSleep() method, inti() will NOT reset allow sleep particular parameter.
void
addTask(Task& aTask)
Adds task aTask to the execution queue (or chain) of tasks by appending it to the end of the chain. If two tasks are scheduled for execution, the sequence will match the order in which tasks were appended to the chain. However, in reality, due to different timing of task execution, the actual order may be different.
Note: Currently, changing the execution sequence in a chain dynamically is not supported.
If you need to reorder the chain sequence – initialize the scheduler and re-add the tasks in a different order.
void
deleteTask(Task& aTask)
Deletes task aTask from the execution chain. The chain of remaining tasks is linked together (i.e
if original task chain is 1 → 2 → 3 → 4, deleting 3 will result in 1 → 2 → 4).
Note: it is not required to delete a task from the chain. A disabled task will not be executed anyway, but you save a few microseconds per scheduling pass by deleting it, since it is not even considered for execution.
An example of proper use of this method would be running some sort of initialize task in the chain, and then deleting it from the chain since it only needs to run once.
void allowSleep(bool aState)
Available in API only if compiled with _TASK_TIMECRITICAL enabled. Controls whether scheduler is allowed (aState =true), or not (aState =false) to put processor into IDLE sleep mode in case not tasks are scheduled to run.
The default behavior of scheduler upon creation is to allow sleep mode.
void
enableAll(bool aRecursive= true)
void disableAll(bool aRecursive= true)
enables and disables (respectively) all tasks in the chain. Convenient if your need to enable/disable majority of the tasks (i.e. disable all and then enable one).
If support for layered task priority is enabled, supplying aRecursive parameter will enable/disable higher priority tasks as well (true, default), or tasks only on this priority layer (false).
Task& currentTask()
Returns reference to the task, currently executing via execute() loop OR for OnEnable and OnDisable methods, reference to the task being enabled or disabled.
This distinction is important because one task can activate the other, and OnEnable should be referring to the task being enabled, not being executed.
Could be used by callback methods to identify which Task actually invoked this callback method.
void* currentLts()
Returns pointer to Local Task Storage of the task, currently executing via execute() loop OR for OnEnable and OnDisable methods, task being enabled or disabled.
bool execute()
Executes one scheduling pass, including (in case of the base priority scheduler) end-of-pass sleep. This method is typically placed inside the loop() method of the sketch. Since execute exits after every pass, you can put additional statements after execute inside the loop().
If layered task prioritization is enabled, all higher priority tasks will be evaluated and invoked by the base execute() method. There is no need to call execute() of the higher priority schedulers explicitly.
Generally, base priority execute will perform the following steps:
Call higher priority scheduler’s execute method, if provided.
Ignore task completely if it is disabled.
Disable task if it ran out of iterations (calling OnDisable, if necessary).
Check if task is waiting on a StatusRequest object, and make appropriate scheduling arrangements
Perform necessary timing calculations
Invoke task's callback method, if it is time to do so, and one is provided.
Put microcontroller to sleep (if requested and supported) if none of the tasks were invoked.
Please NOTE: schedule-related calculations are performed prior to task's callback method invocation. This allows tasks to manipulate their runtime parameters (like execution interval) directly.
bool isOverrun()
If library is compiled with _TASK_TIMECRITICAL enabled, this method returns true if currently invoked task has overrun its scheduled start time when it was invoked. Returns false if task has been invoked according to schedule.
TASK PRIORITY:
void
setHighPriorityScheduler(Scheduler* aScheduler);
If library is compiled with _TASK_PRIORITY enabled, this method associates current scheduler with a higher priority scheduler.
NOTE: Only one execute() method needs to be explicitly called in the main loop(). That is the execute method of base priority scheduler. All higher priority schedulers are called by the base priority scheduler.
static Scheduler& currentScheduler()
If library is compiled with _TASK_PRIORITY enabled, this method returns reference to a scheduler, which invoked current task.
NOTE: Please refer to examples 11 and 12 for illustration of Task Priority functionality
CONSTANTS:
TASK_SECOND (1000)
Task interval of 1 second
TASK_MINUTE (60000)
Task interval of 1 minute
TASK_HOUR (3600000)
Task interval of 1 hour
TASK_FOREVER (-1)
Task number of iterations for infinite number of iterations
TASK_ONCE (1)
Task single iteration
TASK_IMMEDIATE (0)
Task interval for immediate execution
IMPLEMENTATION SCENARIOS AND IDEAS:
EVENT DRIVEN PROGRAMMING
Each of the processes of your application becomes a separate and distinct programming area, which may or may not interact and control each other.
Example:
In a plant watering system you need to measure soil humidity, control pump and display the results
Each of the areas becomes a task:
Task
tMeasure (TMEASURE_INTERVAL*SECOND, TASK_FOREVER,
&measureCallback);
Task tWater
(TWATER_INTERVAL*SECOND, RETRIES, &waterCallback);
Task
tDisplay (TDISPLAY_INTERVAL*SECOND, TASK_FOREVER,
&displayCallback);
Scheduler
taskManager;
Further, once you turn on the pump, you keep it running for TWATER_INTERVAL interval and then turn it off. Turning off a pump is also a task which only needs to run once for every time the pump is turned on:
Task
tWaterOff
(WATERTIME*SECOND, TASK_ONCE,
&waterOffCallback);
Example of the callback method:
void
waterOffCallback() {
motorOff();
tWater.enableDelayed();
}
or
void
waterCallback() {
if (tWater.getIterations()) {
//
If this is not the last iteration = turn the pump on
motorOn();
tWaterOff.set(parameters.watertime * TASK_SECOND,
TASK_ONCE, &waterOffCallback);
tWaterOff.enableDelayed();
return;
}
//
We could not reach target humidity – something is wrong
motorOff;
taskManager.disableAll();
tError.enable();
}
Your sample setup() and loop() (partially) are as follows.
Note: please note that tWater is not activated during setup(). It is activated by tMeasure callback once the watering conditions are met.
void setup()
...
tWater.setIterations(parameters.retries);
tWaterOff.setInterval(parameters.watertime * SECOND);
taskManager.init();
taskManager.addTask(tMeasure);
taskManager.addTask(tDisplay);
taskManager.addTask(tWater);
taskManager.addTask(tWaterOff);
tMeasure.enable();
tDisplay.enable();
currentHumidity =
measureHumidity();
}
void loop ()
{
taskManager.execute();
}
“NATIVE” SUPPORT FOR FINITE STATE MACHINE
Define “states” as callback method or methods. Each callback method executes activities specific to a “state” and then “transitions” to the next state by assigning next callback method to the task.
Transition from one state to the next is achieved by setting next callback method at the end of preceding one.
Note: do not call the next callback method explicitly. Yield to the scheduler, and let the scheduler take care of next iteration during the next pass. (Thus giving other tasks change to run their callback methods).
Example: Blinking LED 2 times a second could be achieved this way
Scheduler ts;
Task tLedBlinker (500, TASK_FOREVER, &ledOnCallback, &ts, true);
void ledOnCallback() {
turnLedOn();
tLedBlinker.setCallback(&ledOffCallback);
}
void ledOffCallback() {
turnLedOff();
tLedBlinker.setCallback(&ledOnCallback);
}
setup() {
}
loop () {
ts.execute();
}
Obviously the example is simple, but gives the idea of how the tasks could be used to go through states.
MULTIPLE POSSIBLE CALLBACKS FOR TASK
There may be a need to select an option for callback method based on certain criteria, or randomly.
You can achieve that by defining an array of callback method pointers and selecting one based on the criteria you need.
Example: when a robot detects an obstacle, it may go left, right backwards, etc. Each of the “directions” or “behaviors” are represented by a different callback methods.
Another example of using multiple callbacks:
You may need to “initialize” variables for a particular task.
In this case, define a tasks with two callbacks:
Task tWork (T_INTERVAL, TASK_FOREVER, &workCallbackInit);
…
void workCallbackInit() {
// do your initializationstuff here
// finally assigne the main callback method
tWork.setCallback(&workCallback);
}
void workCallback() {
// main callback method
…
}
The task will initialize during first execution pass and switch to “regular” callback execution starting with second pass. There is a delay between first and second passes of the task (scheduling period, if defined). In order to execute the second pass immediately after initialization first pass, change the above code like this:
void workCallbackInit() {
// do your initializationstuff here
// finally assigne the main callback method
tWork.setCallback(&workCallback);
tWork.enable();
}
The task will run initialization first, then immediately second pass, and then switch to processing at regular intervals starting with a third pass.
INTERRUP-DRIVEN EXECUTION SUPPORT
In case of interrupt-driven program flow, tasks could be scheduled to run once to request asynchronous execution (request), and then re-enabled (restarted) again with a different callback method to process the results.
Example: event driven distance calculation for ultrasonic pulses. EchoPin #6 triggers pin change interrupts on rising and falling edges to determine the length of ultrasonic pulse.
#include
<DirectIO.h>
#include <TaskScheduler.h>
#include
<PinChangeInt.h>
#define TRIGGERPIN 5
#define
ECHOPIN 6
Output<TRIGGERPIN>
pTrigger;
Input<ECHOPIN> pEcho;
Scheduler
r;
Task tMeasure(TASK_SECOND, TASK_FOREVER, &measureCallback,
&r, true);
Task tDisplay(TASK_SECOND, TASK_FOREVER,
&displayCallback, &r, true);
Task tPing(TASK_IMMEDIATE,
TASK_ONCE, &pingCalcCallback, &r, false);
volatile
bool pulseBusy = false;
volatile bool pulseTimeout =
false;
volatile unsigned long pulseStart = 0;
volatile unsigned
long pulseStop = 0;
volatile unsigned long pingDistance =
0;
void pingTrigger(unsigned long aTimeout) {
if
(pulseBusy) return; // do not trigger if in the middle of a pulse
if (pEcho == HIGH) return; // do not trigger if ECHO pin is high
pulseBusy = true;
pulseTimeout = false;
pTrigger = LOW;
delayMicroseconds(4);
pTrigger = HIGH;
tPing.setInterval (aTimeout);
delayMicroseconds(10);
pTrigger = LOW;
tPing.restartDelayed();
// timeout countdown starts now
// will start the pulse clock on the rising edge of ECHO pin
PCintPort::attachInterrupt(ECHOPIN,
&pingStartClock, RISING);
}
//
Start clock on the rising edge of the ultrasonic pulse
void
pingStartClock() {
pulseStart = micros();
PCintPort::detachInterrupt(ECHOPIN); // not sure this is necessary
PCintPort::attachInterrupt(ECHOPIN, &pingStopClock, FALLING);
tPing.restartDelayed();
}
// Stop clock on the falling
edge of the ultrasonic pulse
void pingStopClock() {
pulseStop
= micros();
PcintPort::detachInterrupt(ECHOPIN);
pingDistance =
pulseStop - pulseStart;
pulseBusy = false;
tPing.disable();
// disable timeout
}
//
Stop clock because of the timeout – the wave did not return
void
pingCalcCallback() {
if (pulseBusy) {
pingStopClock();
}
pulseTimeout = true;
}
// Initial measure
callback sets the trigger
void measureCallback() {
if
(pulseBusy) { // already measuring, try again
tMeasure.enable();
return;
}
pingTrigger(30); // 30
milliseconds or max range of ~5.1 meters
tMeasure.setCallback(&measureCallbackWait);
}
//
Wait for the measurement to
void measureCallbackWait() {
if
(pulseBusy) return;
tMeasure.setCallback(&measureCallback);
}
bool state = true;
void displayCallback() {
char d[256];
unsigned long cm = pingDistance * 17 / 100;
// cm
snprintf(d, 256, "pulseStart =
%8lu\tpulseStop=%8lu\tdistance, cm=%8lu", pulseStart, pulseStop,
cm);
Serial.println(d);
}
void setup() {
//
put your setup code here, to run once:
Serial.begin(115200);
pTrigger = LOW;
pEcho =
LOW;
}
void loop() {
// put your main code here,
to run repeatedly:
r.execute();
}
USING ONENABLE AND ONDISBALE METHODS
Consider a task to flash onboard LED for 5 seconds with random frequency. Task should be repeated every 30 seconds indefinitely. Since frequency is random, there are two challenges:
We need to make sure LED is turned OFF at the last iteration
We need to calculate random frequency every time
Below is the implementation using TaskScheduler
#define _TASK_SLEEP_ON_IDLE_RUN
#include <TaskScheduler.h>
#define LEDPIN 13
Scheduler ts;
Task tWrapper(30000, TASK_FOREVER, &WrapperCallback, &ts, true);
Task tBlink(5000, TASK_ONCE, NULL, &ts, false, &BlinkOnEnable, &BlinkOnDisable);
Task tLED(TASK_IMMEDIATE, TASK_FOREVER, NULL, &ts, false, NULL, &LEDOff);
void WrapperCallback() {
Serial.println("In WrapperCallback");
tBlink.restartDelayed(); // LED blinking is initiated
//every 30 seconds for 5 seconds
}
// Upon being enabled, tBlink will define the parameters
// and enable LED blinking task, which actually controls
// the hardware (LED in this example)
bool BlinkOnEnable() {
Serial.println("In BlinkOnEnable");
tLED.setInterval( 500 + random(501) );
tLED.setCallback( &LEDOn);
tLED.enable();
return true; // Task should be enabled
}
// tBlink does not really need a callback method
// since it just waits for 5 seconds for the first
// and only iteration to occur. Once the iteration
// takes place, tBlink is disabled by the Scheduler,
// thus executing its OnDisable method below.
void BlinkOnDisable() {
Serial.println("In BlinkOnDisable");
tLED.disable();
}
void LEDOn () {
Serial.println("In LEDOn");
digitalWrite(LEDPIN, HIGH);
tLED.setCallback( &LEDOff);
}
void LEDOff () {
Serial.println("In LEDOff");
digitalWrite(LEDPIN, LOW);
tLED.setCallback( &LEDOn);
}
// Note that LEDOff method serves as OnDisable method
// to make sure the LED is turned off when the tBlink
// task finishes (or disabled ahead of time)
void setup() {
Serial.begin(115200);
pinMode(LEDPIN, OUTPUT);
}
void loop() {
// put your main code here, to run repeatedly:
ts.execute();
}
USING STATUS REQUEST OBJECTS
This test emulates querying 3 sensors once every 10 seconds, each could respond with a different delay (ultrasonic sensors for instance) and printing a min value of the three when all three have reported their values.
The overall timeout of 1 second is setup as well.
An error message needs to be printed if a timeout occurred instead of a value.
#define _TASK_SLEEP_ON_IDLE_RUN
#define _TASK_STATUS_REQUEST
#include <TaskScheduler.h>
StatusRequest measure;
Scheduler ts;
Task tCycle(10000, TASK_FOREVER, &CycleCallback, &ts, true);
Task tMeasure(TASK_SECOND, TASK_ONCE, &MeasureCallback, &ts, false, &MeasureEnable, &MeasureDisable);
Task tCalculate(&CalcCallback, &ts);
Task tSensor1(TASK_IMMEDIATE, TASK_ONCE, &S1Callback, &ts, false, &S1Enable);
Task tSensor2(TASK_IMMEDIATE, TASK_ONCE, &S2Callback, &ts, false, &S2Enable);
Task tSensor3(TASK_IMMEDIATE, TASK_ONCE, &S3Callback, &ts, false, &S3Enable);
long distance, d1, d2, d3;
void CycleCallback() {
Serial.println("CycleCallback: Initiating measurement cycle every 10 seconds");
tMeasure.restartDelayed();
}
bool MeasureEnable() {
Serial.println("MeasureEnable: Activating sensors");
distance = 0;
measure.setWaiting(3); // Set the StatusRequest to wait for 3 signals.
tCalculate.waitFor(&measure);
tSensor1.restart();
tSensor2.restart();
tSensor3.restart();
return true;
}
void MeasureCallback() {
Serial.println("MeasureCallback: Invoked by calculate task or one second later");
if (measure.pending()) {
tCalculate.disable();
measure.signalComplete(-1); // signal error
Serial.println("MeasureCallback: Timeout!");
}
else {
Serial.print("MeasureCallback: Min distance=");Serial.println(distance);
}
}
void MeasureDisable() {
Serial.println("MeasureDisable: Cleaning up");
tSensor1.disable();
tSensor2.disable();
tSensor3.disable();
}
void CalcCallback() {
Serial.println("CalcCallback: calculating");
distance = -1;
if ( measure.getStatus() >= 0) { // only calculate if statusrequest ended successfully
distance = d1 < d2 ? d1 : d2;
distance = d3 < distance ? d3 : distance;
tMeasure.forceNextIteration();
}
}
/** Simulation code for sensor 1
* ----------------------------
*/
bool S1Enable() {
Serial.print("S1Enable: Triggering sensor1. Delay=");
tSensor1.setInterval( random(1200) ); // Simulating sensor delay, which could go over 1 second and cause timeout
d1 = 0;
Serial.println( tSensor1.getInterval() );
return true;
}
void S1Callback() {
Serial.print("S1Callback: Emulating measurement. d1=");
d1 = random(501); // pick a value from 0 to 500 "centimeters" simulating a measurement
measure.signal();
Serial.println(d1);
}
/** Simulation code for sensor 2
* ----------------------------
*/
bool S2Enable() {
Serial.print("S2Enable: Triggering sensor2. Delay=");
tSensor2.setInterval( random(1200) ); // Simulating sensor delay, which could go over 1 second and cause timeout
d2 = 0;
Serial.println( tSensor2.getInterval() );
return true;
}
void S2Callback() {
Serial.print("S2Callback: Emulating measurement. d2=");
d2 = random(501); // pick a value from 0 to 500 "centimeters" simulating a measurement
measure.signal();
Serial.println(d2);
}
/** Simulation code for sensor 3
* ----------------------------
*/
bool S3Enable() {
Serial.print("S3Enable: Triggering sensor3. Delay=");
tSensor3.setInterval( random(1200) ); // Simulating sensor delay, which could go over 1 second and cause timeout
d3 = 0;
Serial.println( tSensor3.getInterval() );
return true;
}
void S3Callback() {
Serial.print("S3Callback: Emulating measurement. d3=");
d3 = random(501); // pick a value from 0 to 500 "centimeters" simulating a measurement
measure.signal();
Serial.println(d3);
}
/** Main Arduino code
* Not much is left here - everything is taken care of by the framework
*/
void setup() {
Serial.begin(115200);
Serial.println("TaskScheduler StatusRequest Sensor Emulation Test. Complex Test.");
randomSeed(analogRead(A1)+millis());
}
void loop() {
ts.execute();
}
USING LOCAL TASK STORAGE POINTER
Tasks can store a pointer to specific variable, structure or array, which represents variables specific for a particular task. This may be needed if you plan to use same callback method for multiple tasks.
Consider a scenario where you have several sensors of the same type. The actual process of triggering measurement and collecting information is identical. The only difference is the sensor address and a variable for storing the results.
In this case each of the tasks, which performs measurement will utilize the same callback methods. The only difference will be the variables (specific for each of the sensor).
Let's define a sensor data structure and declare a couple of variables (for 2 sensors for instance)
typedef struct {
unsigned int address;
unsigned long distance;
} sensor_data;
sensor_data s1, s2;
Two separate tasks are running to collect sensor data.
(Note that both tasks refer to the same callback methods)
Scheduler ts;
Task t1(100, TASK_FOREVER, &Measure, &ts, false, &MeasureOn);
Task t2(100, TASK_FOREVER, &Measure, &ts, false, &MeasureOn);
Assign pointers to the respective variables in the setup() method:
void setup() {
…
t1.setLtsPointer(&s1);
t2.setLtsPointer(&s2);
…
}
Obtain reference to specific sensor_data structure inside the common callback method:
void Measure() {
Task& T = ts.currentTask();
Sensor_data& V = *((sensor_data*) T.getLtsPointer());
// For t1, V will be pointing at s1
// For t2, V will be pointing at s2
// Alternatively use the Scheduler method:
Sensor_data& V1 = *((sensor_data*) ts.currentLts());
…
V.distance = <calculate your values here>;
}
ENABLING TASK PRIORITIZATION
In certain cases you want a task to be invoked before others in case of scheduling collision (tasks ready to be invoked at the same time). In a flat execution chain scenario tasks are evaluated for execution in the order they were added to the chain. Therefore a single task has to wait for the rest of the chain to be evaluated to get a chance again.
Consider a scenario where a task taking gyroscope measurements has to be invoked as close to the actual scheduling time as possible. That is when task prioritization comes to help.
Let’s say tasks t4 and t5 are taking measurements from gyroscope and accelerometer, and tasks t1, t2 and t3 are doing something less important.
This is how such setup is coded:
#define _TASK_PRIORITY
#include <TaskScheduler.h>
Scheduler r, hpr;
// Tasks
Task t1(1000, TASK_FOREVER, &tCallback, &r); //base priority
Task t2(2000, TASK_FOREVER, &tCallback, &r);
Task t3(3000, TASK_FOREVER, &tCallback, &r);
Task t4(10, TASK_FOREVER, &tCallback, &hpr); // higher priority
Task t5(100, TASK_FOREVER, &tCallback, &hpr); //higher priority
…
void setup () {
…
r.setHighPriorityScheduler(&hpr);
r.enableAll(true); // this will recursively enable the higher priority tasks as well
}
FUTHER INFROMATION
Please refer to examples, provided with TaskScheduler package for further information and implementation options.
Real time examples of TaskScheduler are available here:
http://www.instructables.com/id/APIS-Automated-Plant-Irrigation-System/
http://www.instructables.com/id/Wave-your-hand-to-control-OWI-Robotic-Arm-no-strin/
http://www.instructables.com/id/Arduino-Nano-based-Hexbug-Scarab-Robotic-Spider