HAPSIM and the AVR Studio Simulator
By Alex Wong
PIC Club meeting Aug 2008
AVR STUDIO
- The AVR Studio is Atmel's answer to PIC's MPLAB.
- AVR Studio is an IDE for writing and debugging AVR applications in Windows environments.
- It provides a project management tool, source code editor, simulator, assembler, front-end for compilers, debugger.
- The popular open-source GCC compiler is available for AVR Studio packaged as WINAVR.
- Download and install WINAVR first, then AVR Studio. GCC automatically included as a compiler plug-in.
- Optimised code, wide user base, forum support, free.
- Compiler and library supports all AVR microcontrollers: ATMEGA, ATTINY, AT90, ATXMEGA
AVR SIMULATOR
- AVR Simulator is a software simulator for the AVR devices. It simulates the CPU, including all instructions, interrupts and most of the on-chip I/O modules.
- The AVR Simulator operates within the AVR Studio application as a debug target.
- You can use normal debug commands such as Run, Break, Reset, Single step, set breakpoints and watch variables.
- The I/O, memory and register views are fully functional using the AVR Simulator.
- Debug by single stepping through C or assembler code.
- You can test your code before burning into chip.
HAPSIM
- HAPSIM stands for Helmi's AVR Periphery Simulator
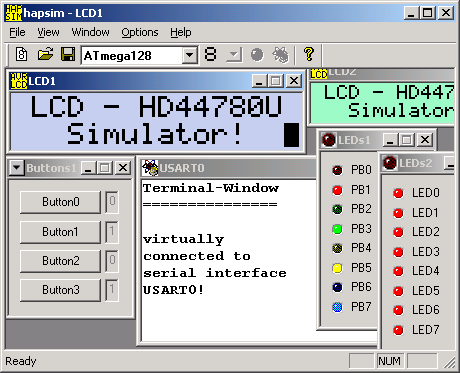
- Provides software-simulated LCD, USART/UART and TWI, LEDs, Push-Buttons and Keypad for the AVR Simulator.
- With AVR Studio and HAPSIM in a laptop, you have a nice, portable workbench to experiment with various
projects.
- Think of long bus trips, waiting at airports, ships, boring dates, etc.

- Supports one or more of the following components simultaneously:
- HD44780U compatible LCD with 40 x 2 or 20 x 4 characters.
- Pushbuttons connected to Input Port Pins.
- LEDs connected to Output Port Pins.
- Terminal connected to USART, UART or TWI(I2C) ports.
- 4x4 Matrix Keypad.
- Watch Cycle Counter and Simulation Speed
- Easy configuration of the components using XML files.
- Targets all microcontrollers supported by the AVR Simulator.
- AVR Studio Version 4.12.452 or higher strongly recommended.
- Code tested with HAPSIM simulator will run on chips (and vice versa).
- Build and run your code in the simulator. It will break at first line.
- Run HAPSIM.EXE then open an existing XML config file.
- Or create new control and add i/o components eg. button, leds.
- Each component has customisable settings eg. PORT, bits.
- Remember to specify your CPU type.
- Once all components are set up, save settings in XML file.
- Continue program simulation and test the virtual peripherals.
- Always build with -DFASTSIM to fake delay timers.
Demo
The supplied demo programs exercise the various HAPSIM components.
- LCDTest
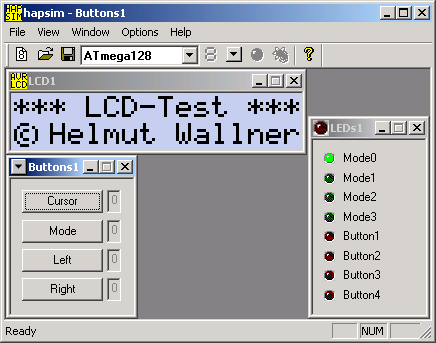
Simulates an LCD connected to an ATmega128 PORTA Pin 4-7

Cursor - cycles thru _, _block, block, invisible cursor
Mode 0: Left/Right overwrites chars
Mode 1: Left/Right move cursor
Mode 2: Left/Right shifts display
Mode 3: Left/Right changes bitmap display
Must reset program to return to Mode 0.
- USART2TWI
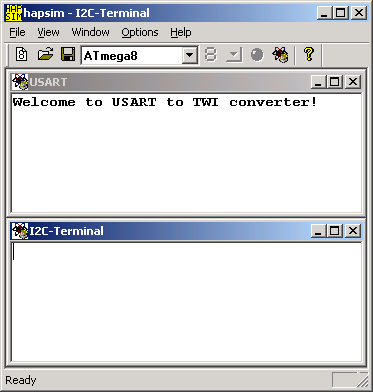
Connects a terminal to USART0 and terminal to TWI (PORTD).
Data received from USART0 is written to TWI.
Data received from TWI sent to USART0.

- UART
Terminal sends data to USART0 which echoes it back. Code also tested on an actual ATtiny2313 with no change.
- TestKeypad
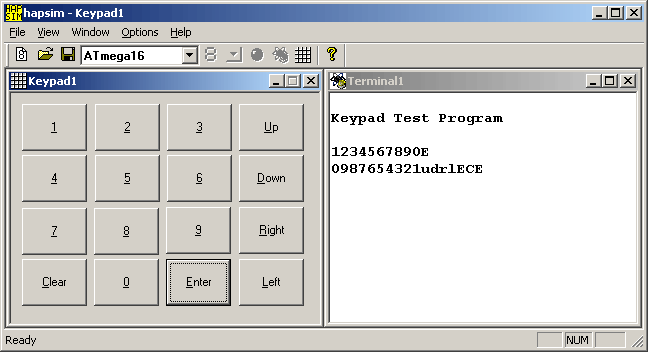
Simulates a 0-9 cursor keypad with selection sent to terminal.
Must define D FASTSIM in Project -> Config Options -> Custom Options.

- Trinary Button
- utrans
- ToggleLED
Pushbutton turns LED on/off but has startup bug. Code also tested on an actual ATtiny2313 with no problems.
Tips and Tricks
- Must specify correct F_CPU clock speed for baud rate to work properly.
- Single-stepping can give misleading results with uart i/o.
- Disable code optimisation for debugging. But larger code size, timer delays and watchdog affected.
- Switch debounce using delays do not simulate accurately unless you specify -D FASTSIM build option.
- Certain antivirus eg. Trend Micro will block HAPSIM dll hook.
- Always stop AVR simulation before closing HAPSIM.


